Interactive Design - Project 1 : Prototype Design
13/5/2024 - 27/5/2024 ( Week 4 - Week 6 )
Ho Winnie / 0364866
Interactive Design / Bachelor's of Design Honors In Creative Media
Project 1 : Prototype Design
Objective: In this first part of the assignment, you
will focus on creating a UI design prototype for your digital resume or
curriculum vitae (CV) using prototyping software such as Adobe XD or
Figma. The UI design prototype will showcase the layout, visual elements,
and user interface interactions of your digital resume.
Requirements:
A. Content and Structure:
Prepare the content for your resume, including personal details,
education, work experience, skills, projects, and other relevant sections.
Decide on the order and hierarchy of
sections based on their importance and relevance.
B. Layout and Visual Design:
Design the layout of your digital resume using the chosen prototyping
software. Define the placement of different sections and how they will
flow together.
Apply a consistent visual design using typography, color palette, and
appropriate spacing.
C. Sections and Organization:
Organize your resume into logical sections, such as "Profile,"
"Education," "Experience," "Skills," "Projects," and "Contact."
Prioritize sections based on their relevance and significance to the
position you're targeting
D. Visual Elements:
Incorporate relevant images, icons, or placeholders that align with the
content and enhance the visual appeal of your digital resume.
E. Prototype Presentation:
Update your e-portfolio explaining and showcasing the processes of the
task
1. Project 1 - Prototype Design
Research & Sketches :
I first started out by looking for inspirations and ideas online on
Pinterest. I searched for "online digital resumes" and also looked at
portfolio landing pages.

|
| Fig 1.1 Research Ideas & References , Week 5 (5/20/2024) |
I than proceeded to sketch out 4 different layouts with different
designs
Fig 1.2 Paper Sketches , Week 5 (5/20/2024)
Digitalization :
Among all 4 layouts, I personally prefer layout 1 and proceeded to digitalize it using Figma. I begin by setting the layout grids first so it is easier for me to place my elements later. I decided on a 4 column grid, stretch type with gutter of 16
 |
| Fig 1.3 Grid Layout settings, Week 5 (5/21/2024) |
 |
| Fig 1.4 Process #1 , Week 5 (5/21/2024) |
I applied auto layout to each section to ensure the spacings are set and to make it responsive.
 |
| Fig 1.5 Process #2 , Week 5 (5/21/2024) |
Under my profile section, I decided to add the contact section right away below to ensure it is easier for people to find me, instead of scrolling all the way to the bottom.
 |
| Fig 1.6 Process #3 , Week 5 (5/21/2024) |
For the next section, I added my experiences, education and awards I won as the main body. Following the grid I set, i divided the sections into 3 equal parts and align it.
 |
| Fig 1.7 Process #4, Week 5 (5/21/2024) |
Auto layout is applied in each section and the spacing between each column is set at 16.
 |
| Fig 1.8 Process #5, Week 5 (5/21/2024) |
I created my buttons accordingly using auto layout as well to ensure that when the size is shrinked, the buttons respond together as well.
Fig 1.9 Auto layouts , Week 5 (5/21/2024)
 |

 |
| Fig 2.0 Process #6 , Week 5 (5/21/2024) |
Last but not least is my project section, I decided to include it at the bottom because readers can check out my projects after they understood the skills and experience I have.

 |
| Fig 2.1 Process #7 , Week 5 (5/21/2024) |
First look of resume CV without grids :
 |
| Fig 2.2 First Digitalization , Week 5 (5/21/2024) |
However, after much thoughts, I felt that this design was difficult to make it responsive due to my name at the side being too large. It felt difficult to make it responsive as screen size changes so i decided to re-layout my name.
 |
| Fig 2.3 Process #8 , Week 5 (5/21/2024) |
I changed it to be at the top at the CV, making it a whole section by itself. In this way, when coding it out, it is easier to make it responsive too.
Second look of resume CV without grids :
 |
| Fig 2.4 Second Digitalization , Week 5 (5/21/2024) |
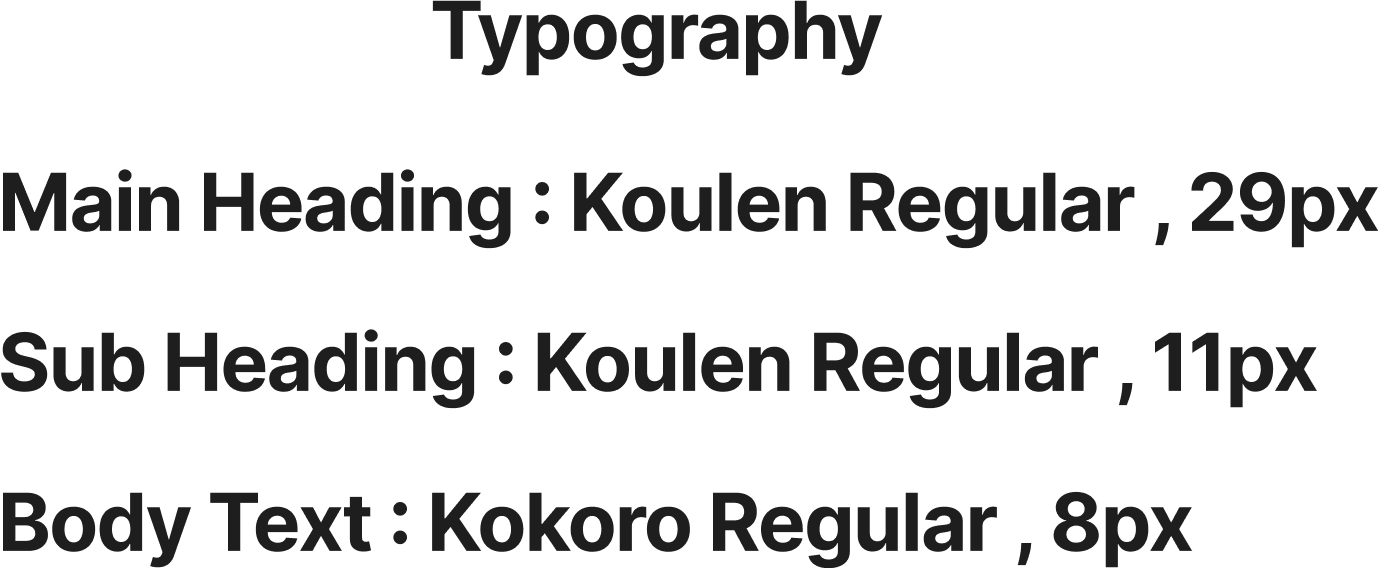
Below are the design system used for this CV creation, I aim to go for a rather minimalist color palette that has high contrast at the same time :


 |
| Fig 2.5 Design System , Week 5 (5/23/2024) |
View my CV Prototype in Figma :
2. Feedback
Week 4 :
Mr Shamsul complimented the clean yet eye catching layout of my CV, however he commented that I can match other color palettes to see if it will fit well or else I can just submit my current copy.
3. Reflection
I have been a long-term user of Figma, and navigating through this project using the platform was fairly easy and intuitive. My familiarity with Figma's robust design tools and features allowed me to efficiently create high-quality designs, streamlining the overall workflow. This experience was particularly enjoyable as I had the opportunity to design my own CV, incorporating creative elements and personalized touches. Additionally, I found it inspiring to look at examples from my friends, which provided diverse perspectives and innovative ideas.
However, while designing in Figma, it is crucial to keep in mind the feasibility of translating the design into code. As we move forward to our next project, which involves coding our CVs, this consideration becomes even more important. Ensuring that our designs are practical and achievable in a coding environment will save time and effort during the development phase. It’s essential to balance creativity with technical constraints, making sure that the visual appeal does not compromise the functionality and usability of the final product.
QUICKLINKS


Comments
Post a Comment